
Editor’s Note: This is a guest post from Jerred Moon.
Are you sick of all that is involved with getting in shape — with becoming stronger and fitter?
Training and getting in shape can be a chore at times, but is it really the training you don’t enjoy? With a little observation, or self-analysis, you may find the chore is often not the training itself. Of course, you may not love to exercise, but is it really that bad?
The worst part about fitness is all that comes with it: a long commute to the gym, crowds of people, occupied equipment, hygiene concerns, monthly fees, and much more. You have a job, family, and all of life’s chores and tasks to worry about. Who wants to start or end their day with what feels like another chore? A trip to the gym involves changing into appropriate clothes, driving, waiting, more driving…and the routine simply takes you from one climate-controlled box (work) to another (the gym) with your only chance for fresh air coming from walking across the parking lot. Not to mention that every day that you “just don’t feel like it” and decide to skip the gym, it costs you money!
Commercial gyms are designed for the masses — TVs, isolation machines, and a bunch of stuff you don’t really need. It may make you feel better to have “gone to the gym today” but wouldn’t you rather train effectively and efficiently?
Your head should be nodding at this point.
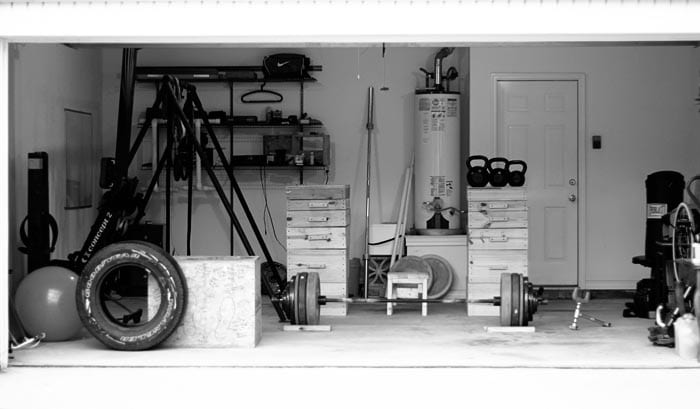
The solution to all of your fitness problems is a garage gym!
Perhaps when you think of a garage gym, you think of Rocky Balboa chasing chickens and lifting logs. Or maybe you think of a version of your commercial gym stuffed in your garage.
The reality is somewhere in between. A garage gym can be an effective and efficient world-class training facility. It is built to suit your performance. Some of the fittest people in the world train in garage gyms regularly because they know the secret. Less equipment, fewer isolation exercises, less junk, but more efficient training.
The thought which will eventually cross your mind is, “I don’t have the money or time to make my own garage my gym.” While certainly not dirt cheap, you can do it for as little as $500, which is the equivalent of about a year and a half of the cheapest gym pass. If you use your garage gym for just two years, you will have made money on the investment. In addition, it only takes about two weeks to complete. And that’s if you take your time.
Are you convinced yet? Ready to start a garage gym? Let’s get started!
What I Started With:
- 45lb. Olympic Bar
- three kettlebells (35lb., 55lb., and 70lb.)
- two 45lb. bumper plates
- two 35lb. bumper plates
- two 25lb. bumper plates
- two 10lb. bumper plates
- two 5lb. plates
- a power rack with pull-up bar*
- parallettes*
- weight rack storage
- rings
- a plyometric box*
- a 20lb. medicine ball*
- a tire for dragging and odd object lifting
- squat/press stands
- bench press stands
- a bench
- a reverse hyper
- a speed rope
*DIY projects shown below
Step 1: The Big Purchase
The big purchase has to be the first thing you do when you are starting a serious garage gym. It means you are fully committed and the big purchase will help keep you accountable. This is the stuff you cannot build yourself or may be too challenging to find used, like a barbell, plates, kettlebells, etc.
Another reason the big purchase is what we do first is because it can take two weeks for the order to come in. This will give us time to set up shop in the garage and get ready for some serious training once the weight is delivered.
First, you have to decide what you need. My list above works really well for most. However, do you want or need rubberized bumper plates? Do you want only iron plates? Do you care if you have new or used equipment? I didn’t go the least expensive route when I first started my garage gym. I bought it all new and I bought the colored, rubberized bumper plates (expensive). If you buy plain black or go the used route you can get it all for much cheaper than I did. You don’t need ALL bumper plates for a garage.
You may be asking, “What is a bumper plate good for?” These plates are good for overhead lifts and quick, high-intensity workouts in which speed is of the essence. This way you can drop the weight. You really only need two 45lb. bumper plates as a base and you can add smaller iron weights that don’t touch the ground for everything else. When squatting or deadlifting, just use iron. I recommend getting more than just two 45lb. plates, depending on your strength level. If you are really strong you will need a combination of bumper plates and iron plates. If you are not as strong, some of the plain bumper package deals will be perfect for you.
Luckily, the popularity of CrossFit and the sport of weightlifting have exploded in recent years. This popularity has made getting high-quality barbells, plates, and other equipment much more economical.
Step 2: Get the Garage Ready
Embrace the idea of street parking!
Now that the big purchase is made and we are waiting on delivery, it is time to get to work on the garage itself!
When it comes to garage gyms, there are two options. Option one, you can have a garage with a gym in it, or, option two, you can have a gym that is in the shell of a garage. In other words, you can either maintain a garage for storage and all your household items, or you can fully dedicate your garage to being a gym and nothing else. The more viable option for most will be option one. Either way you are probably going to have to declutter. Organization and storage are your two priorities at this point.
Storage Ideas:
If you are not an organized person, it is time to change. If you want a garage gym, that is. If you have a lot of stuff that you need to keep (yes, getting rid of stuff is a real option) you will have to get creative.
- Hang storage containers from the ceiling
- Have a dedicated wall for stackable containers
- Move things to a storage unit (not ideal, due to the monthly cost which you’re trying to save by doing this in the first place)
- Throw things away
- Garage sale
If you have a lot of stuff in your garage that you would not mind getting rid of, have a garage sale. This does two things for you, obviously, the first thing is it gives you room for a garage gym. The second awesome thing a garage sale can do for you is it may completely pay for your equipment! Now you really have no excuse.
Bottom line is you don’t need a ton of space, but you will need a dedicated portion of the garage for lifting weights. Clean up, clean out, and keep it clean. You will have to get creative and organized. I recommend having one side of the space for “garage” items and one side for gym items. However you do it, just make sure there is enough space for you to workout, which requires a little planning.
Luckily, the planning for this gym is as easy as scrolling through all the DIY projects we are planning to build (shown in step 3, below). Make sure you have enough space for them and make sure you want all of them. You can cherrypick which projects you like and do not like. Once you have made up your mind you can sketch it on paper, draw it on a whiteboard, or even tape it out on your garage floor. The more realistic you can picture it, the better off you will be. This way we do not work ourselves into a corner here. Do not skip planning — make sure you have a good idea of where absolutely everything will go.
Oh, and if you are married, like me, be sure to run all this stuff by your wife. Maybe that should have been step one…oops.
Step 3: Do It Yourself Projects
You certainly have the option of just buying everything for your gym. To really make it yours, however, and to save some cash, you can build a few pieces on your own. I recommend, to start, building these four projects:
- Plyometric Box
- Power Rack
- Medicine Ball
- Parallettes
These first few items will help you get started with a core garage gym, and you could get it all done in one dedicated weekend. However, if you are interested in even more projects, there are over a dozen garage gym DIY project tutorials at the DIY Corner.
Plyometric Box
The first project is a plyometric box. One sheet of plywood, six cuts to suit the size you need, some glue, and screws and you are done! A plyometric box can be used for box jumps, dips, step-ups, box squats, and any other creative exercise you can think of. It is a very quick and easy project. It will only cost about $20, take you about 30 minutes, and is not very difficult to complete. Click here for the full tutorial.
Power Rack
The second project is a little more difficult and time consuming: a power rack. However, if you build this project, and take care of it, it will last a long time and give you a great training capability. You will be able to squat with safety bars and make use of a pull-up bar. You can make any modification you like to suit your needs. If this project is too advanced for you, I recommend some cement buckets and 4x4s — you can find that project here. For the full power rack project, check out the instructions here.
Medicine Ball
The third project is very quick and easy: a medicine ball. Just cut open a basketball, fill it with pool salt (not sand) and patch it up. Now you have a medicine ball! A medicine ball is great for wall ball shots (squatting with and throwing to a target 10 feet away), weighted sit-ups, medicine ball cleans, and many other exercises. It is a must when starting a garage gym, and you can check out the full instructions here.
Parallettes
The fourth project is also quick and easy: parallettes. Parallettes are great for deficit push-ups, L-sits, dips, pass throughs, and many other exercises. This project just takes a few cuts of PVC, some PVC cement, and you are good to go. Very easy and a great addition to a garage gym — you can check out that project here.
These projects are just the start, but with a solid foundation and these few items, you will have enough equipment to have a very simple and effective garage gym. As you become more experienced and learn more about how you operate in a garage gym you can slowly expand your DIY arsenal or purchase the additional items you need.
As with any do-it-yourself project, unfamiliarity with the tools and process can be dangerous. If you are at all uncomfortable or inexperienced working on DIY projects (especially projects involving dangerous tools), please reconsider doing the job yourself. It is very possible on any DIY to damage your property, create a hazardous condition, or harm yourself or others. Be careful!
Conclusion
Ready to get extremely fit, at home? Are you ready for a garage gym?
It is time to take a stand. It is time get rid of all the supplements that don’t work and that you don’t need, time to trade in the crazy-expensive gym memberships, and throw away the fitness magazines that push useless products and programs designed for people who aren’t you.
It is time to start making some decisions for yourself, and decisions affecting your health should not be taken lightly. Thomas Jefferson put it this way, “Leave all the afternoon for exercise and recreation, which are as necessary as reading. I will rather say more necessary because health is worth more than learning.”
Good luck on your garage gym!
Do you have a garage gym? What do you have in it? Share with us in the comments!
________________________________________
Jerred Moon is a strength & conditioning addict, wanna-be adrenaline junkie, loving husband and proud father. He runs a fitness website for the “other guys” called End of Three Fitness and is also the creator of the One Man One Barbell program.
Similar Articles: Wojciech Braszczok st louis cardinals scarlett johansson calvin johnson dodgers
No comments:
Post a Comment
Note: Only a member of this blog may post a comment.